Dyte REST API Quickstart
Dyte's API follows the REST principles. It has predictable resource-oriented URLs, accepts JSON-encoded request bodies, returns JSON-encoded responses, and uses standard HTTP response codes, authentication, and verbs.
This topic describes how to get started with Dyte v2 REST APIs.
Before getting started with this quickstart guide, we recommend that you read Getting Started with Dyte to familiarize yourself with Dyte.
Objectives
In this quickstart you'll learn:
- How to access Dyte APIs
- How to authenticate the requests
- How to create presets
- How to add voice and video calls to your applications using Dyte APIs
Initial Setup
Perform the following steps to get started with Dyte APIs:
Step 1: Access APIs
You can access all of our v2 API endpoints at https://api.dyte.io/v2/.
For the complete list of routes, see API documentation.
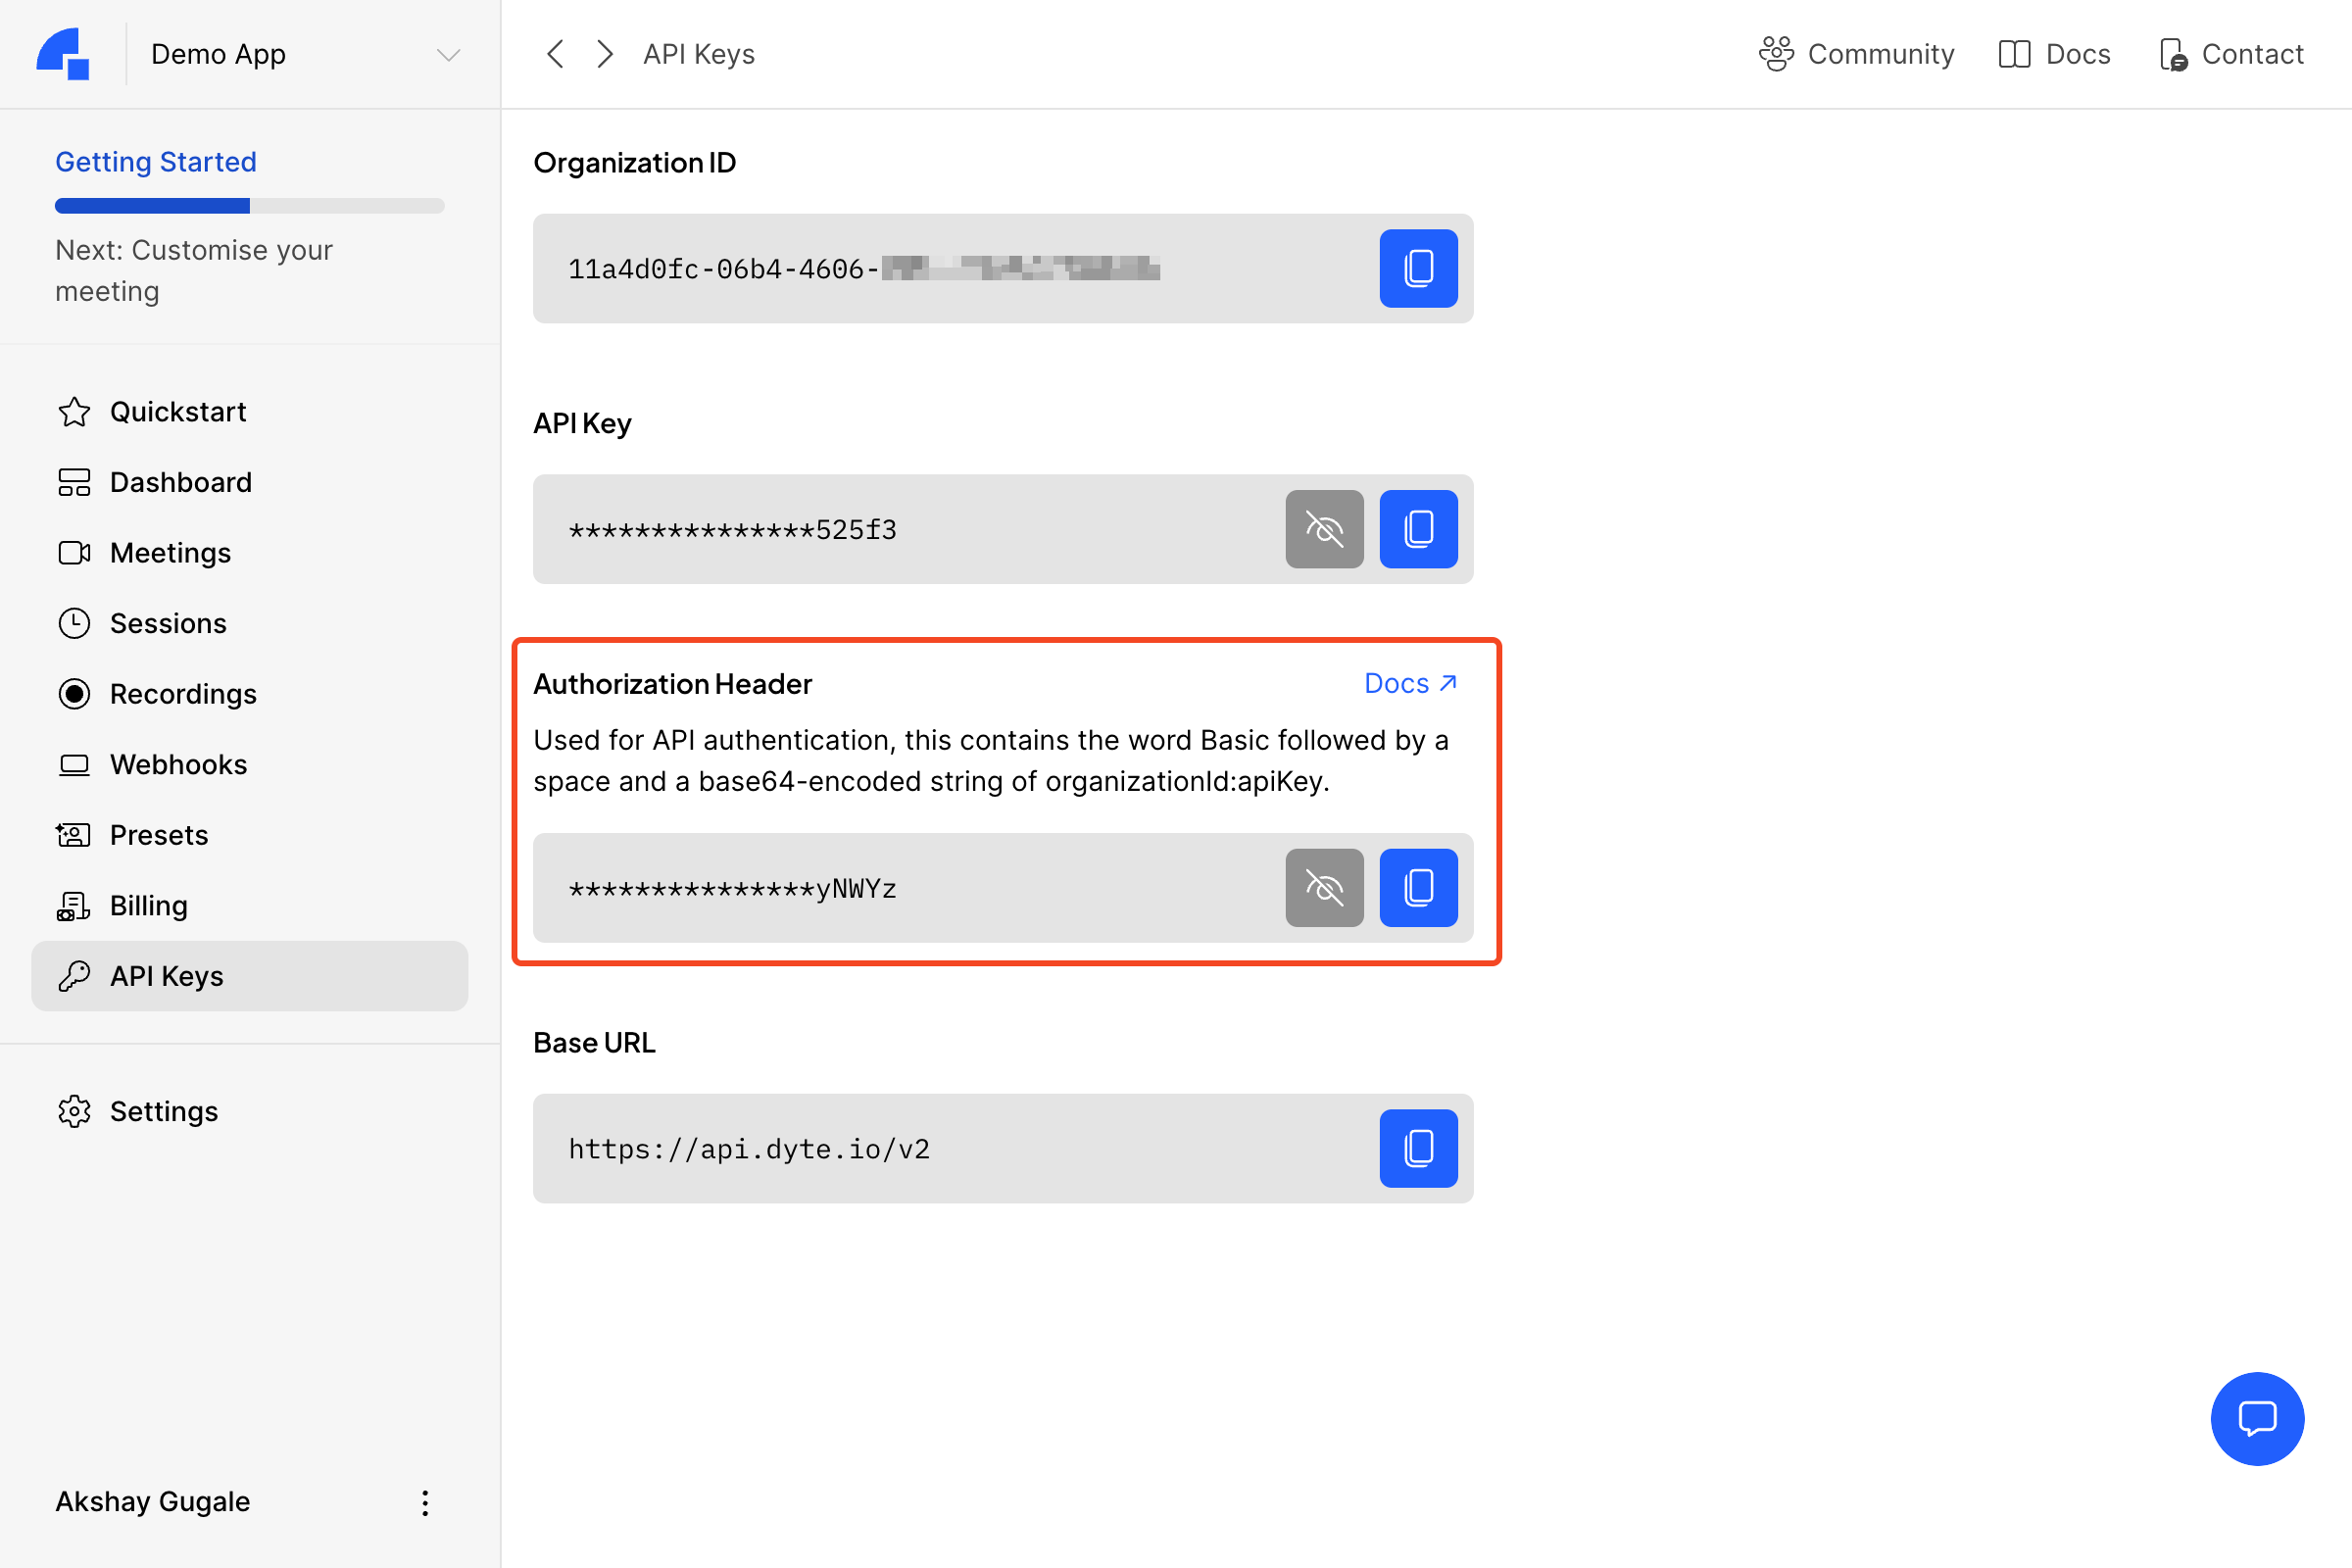
Step 2: Authenticate using your API Keys
Dyte's APIs use API Keys to authenticate requests via
HTTP Basic Auth. To
perform the authentication, an HTTP request is sent with an Authorization header
that contains the word Basic followed by a space and a base64-encoded string
organizationId:apiKey.
For example, Authorization: Basic ZGVtbzpwQDU1dzByZA==
- First, register on our Developer Portal.
- Go to API Keys section.
- Copy the Authorization Header
- Use the copied header in your API requests.
Step 3: Create Presets
Create presets using the Developer portal. A preset is a set of permissions and UI configurations that is applied to a participant.
Add Video Calls to your Application using Dyte APIs
This section focuses on how to add voice and video calls to your applications using Dyte APIs. A typical workflow includes the following steps:
- Create a meeting
- Add participants to the meeting
- Record the meeting
- Receive events using webhooks
Step 1: Create a Meeting
You must first create a meeting in order to begin using Dyte for voice and video calls.
Request
This request returns a parameter called id, which is your meeting ID. The
meeting ID is required for subsequent operations like adding participants.
curl --request POST \
  --url https://api.dyte.io/v2/meetings \
  --header 'Authorization: Basic <api_authorization_token>' \
  --header 'Content-Type: application/json' \
  --data '{
  "title": "Sample meeting",
  "preferred_region": "ap-south-1",
  "record_on_start": false
}'
Response
{
  "success": true,
  "data": {
    "id": "497f6eca-6276-4993-bfeb-53cbbbba6f08",
    "preferred_region": "ap-south-1",
    "waiting_room": true,
    "record_on_start": true,
    "created_at": "2019-08-24T14:15:22Z",
    "updated_at": "2019-08-24T14:15:22Z"
  }
}
Step 2: Add Participants
Once you've created a meeting, you can add participants to the meeting.
Request
This request returns a token, which is required to initialize the frontend SDKs.
The preset name created earlier must be passed in the request.
curl --request POST \
  --url https://api.dyte.io/v2/meetings/<meetingId>/participants \
  --header 'Authorization: Basic <api_authorization_token>' \
  --header 'Content-Type: application/json' \
  --data '{
  "name": "Mary Sue",
  "picture": "https://i.imgur.com/test.jpg",
  "preset_name": "string",
  "client_specific_id": "string"
}'
Response
{
  "success": true,
  "data": {
    "id": "497f6eca-6276-4993-bfeb-53cbbbba6f08",
    "name": "string",
    "picture": "http://example.com",
    "client_specific_id": "string",
    "preset_name": "string",
    "created_at": "2019-08-24T14:15:22Z",
    "updated_at": "2019-08-24T14:15:22Z",
    "token": "eyJhbGciOiJSUzI1NiIsInR5cCI6IkpXVCJ9.eyJvcmdJZCI6IjM5MGJmMjc0LTQxMzMtNDI2ZC04NDkxLWVhN2ExYTE5MDQ4YiIsIm1lZXRpbmdJZCI6ImY5MTMzODM0LWE4MmYtNGNhYi05OTRiLWY3M2RiMmQwNmY4OCIsInBhcnRpY2lwYW50SWQiOiIxZDVhNTkyMy1iYzY5LTQ5ZDAtODJhNy1lZDIzZmE0ZTUyZWYiLCJwcmVzZXRJZCI6Ijg3NzNiZDAzLTkzNjItNDdjNy1hNzlkLThmNTQxMWMyNDc2NiIsImlhdCI6MTY2OTgzMDE5OCwiZXhwIjoxNjc4NDcwMTk4fQ.ngSKuI24JHtPxiimrGT1Vkk7_AdvrMRwkbltvlWpyWmmm14-Kl4OUVw2nm7q0S2uEgw7xXRz8faxzzJTMogkKlUSXGXOpUc_lXYH9h7u29MCFf3nJDy_FZIsSgPmULLoF3p4OlU9wNSwEnO0h856PdB4MfAuXxa24vkgI1tplzBPOS4NcW9x8pfE7J98ixVZKcPvqNig_pLOypy0j5Pd3CHdi25EFml1Fr0iyui4hDrjE-mzMnYwvojkXSb47MSxVoOLGvWn__dL2qrPSho4C3fhb_HEupWAzCHMDBpl1IGhazN1-mZ40WNYsKFFcch89qOsr0dA2C_d0PHVzCVP3A"
  }
}
Step 3: Record the Meeting
You can manage your recordings in Dyte using Basic or Bearer authentication
methods. If you're using Bearer authentication, then you need to use the
token returned by the Add Participants API
request.
Start recording
storage_config is an optional parameter. If you specify the storage
configuration, the recording will be stored in your S3 bucket as well.
Request
curl --request POST \
  --url https://api.dyte.io/v2/recordings \
  --header 'Authorization: Basic <api_authorization_token>' \
  --header 'Content-Type: application/json' \
  --data '{
  "meeting_id": "97440c6a-140b-40a9-9499-b23fd7a3868a",
  "storage_config": {
    "type": "aws",
    "access_key": "string",
    "secret_key": "string",
    "region": "us-east-1",
    "bucket": "string",
    "path": "string"
  }
}'
Response
{
  "success": true,
  "data": {
    "id": "a776cc7e-54b8-4915-a748-8afc6bf98140",
    "download_url": null,
    "download_url_expiry": null,
    "file_size": null,
    "session_id": null,
    "output_file_name": "d9fc4d6a-a5a0-4430-9a73-d4ba14e597f9_1669882270392.mp4",
    "status": "INVOKED",
    "invoked_time": "2022-12-01T08:11:10.430Z",
    "started_time": null,
    "stopped_time": null,
    "storage_config": {
      "id": "5f48f84c-4628-44b8-8953-64c67c714de7",
      "type": "aws",
      "region": "ap-south-1",
      "bucket": "dyte",
      "path": "/"
    }
  }
}
Stop recording
Request
curl --request PUT \
  --url https://api.staging.dyte.in/v2/recordings/<recordingId> \
  --header 'Authorization: Basic <api_authorization_token>' \
  --header 'Content-Type: application/json' \
  --data '{
  "action": "stop"
}'
Response
The UPLOADING status indicates that the recording is still being uploaded to
the server asynchronously. The upload process may take longer depending on the
size of the file.
To monitor the status of recordings, you can listen to the
recording.statusUpdate events using webhooks.
{
  "success": true,
  "data": {
    "id": "a776cc7e-54b8-4915-a748-8afc6bf98140",
    "download_url": null,
    "download_url_expiry": null,
    "file_size": null,
    "session_id": "622dfa7b-ae00-4ba1-bba0-d6d0cc9e6c7d",
    "output_file_name": "d9fc4d6a-a5a0-4430-9a73-d4ba14e597f9_1669882270392.mp4",
    "status": "UPLOADING",
    "invoked_time": "2022-12-01T08:11:10.430Z",
    "started_time": "2022-12-01T08:11:12.023Z",
    "meeting": {
      "waiting_room": false,
      "id": "d9fc4d6a-a5a0-4430-9a73-d4ba14e597f9",
      "title": "Backend Standup",
      "record_on_start": false,
      "created_at": "2022-12-01T07:01:23.990Z",
      "updated_at": "2022-12-01T07:01:23.990Z"
    },
    "storage_config": {
      "id": "5f38f84c-4628-44b8-8953-64c67c714de7",
      "type": "aws",
      "region": "ap-south-1",
      "bucket": "dyte",
      "path": "/"
    }
  }
}
Step 4: Add a Webhook
Dyte uses webhooks to notify your application when an event occurs. Webhooks are especially useful for asynchronous events like when a recording is uploaded or a new participant joins the meeting.
Dyte can push real-time updates to your application via a webhook. Events are sent to your webhook endpoint as a JSON payload over HTTPS. These events can then be used to perform actions in your backend systems.
For example, here is how to create a webhook that listens for all participant joining/leaving events.
Request
When a participant joins or leaves a meeting, this will trigger the webhook and send the event.
curl --request POST \
  --url https://api.dyte.io/v2/webhooks \
  --header 'Authorization: Basic <api_authorization_token>' \
  --header 'Content-Type: application/json' \
  --data '{
  "name": "Attendance",
  "url": "https://webhook.site/#!/b23a5bbd-c8b0-4ced-a9e2-78ae7889897e",
  "events": [
    "meeting.participantJoined",
    "meeting.participantLeft"
  ]
}'
Response
{
  "event": "meeting.participantJoined",
  "meeting": {
    "id": "d9fc4d6a-a5a0-4430-9a73-d4ba14e597f9",
    "title": "Backend Standup",
    "roomName": "d9fc4d6a-a5a0-4430-9a73-d4ba14e597f9",
    "status": "LIVE",
    "createdAt": "2022-12-01T08:08:36.593Z",
    "startedAt": "2022-12-01T08:08:36.593Z",
    "organizedBy": {
      "id": "70c5d391-4bac-4cf3-9907-bec205798adb",
      "name": "Test Org"
    }
  },
  "participant": {
    "peerId": "1087822b-0673-47c9-abc9-582ccc8b4057",
    "userDisplayName": "Participant nfiu92xa1jd",
    "clientSpecificId": "anrxl1m34a4"
  }
}
For more information on how to create webhook endpoints, see Creating webhook endpoints.